Friday, November 20, 2009

Lesson 14 - Explosions - Bombs - Mines - dod_bombtarget

If you are New to Mapping Click this link and start at the beginning.


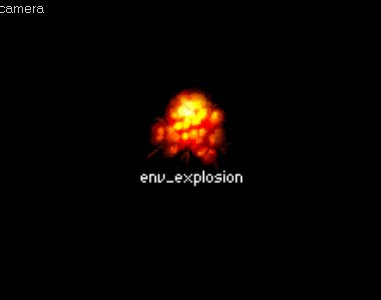
To make a bomb you need to use env_explosion.
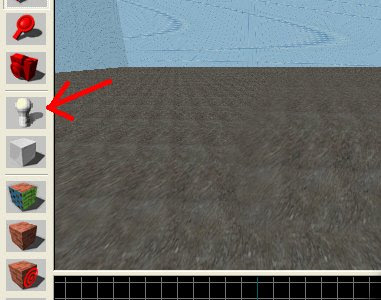

Select the entity tool.
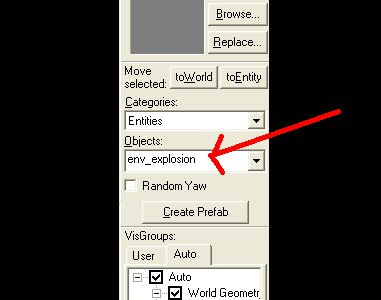

Choose env_explosion from the pulldown menu.
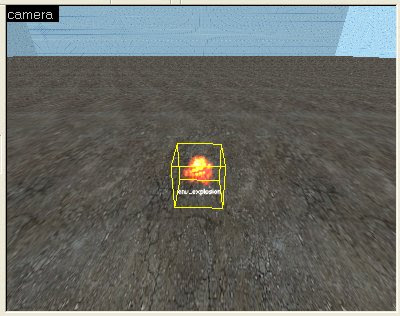

Place it in your map.
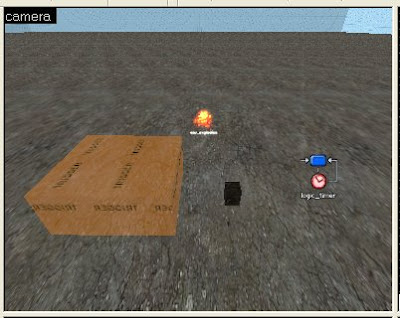

To make the env_explosion explode, you need to use either a trigger brush, a button, or a logic_timer.
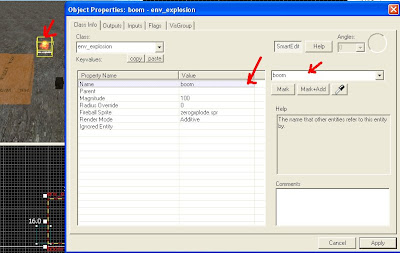

Double click on the env_explosion. And give your env_explosion a name. Click apply.
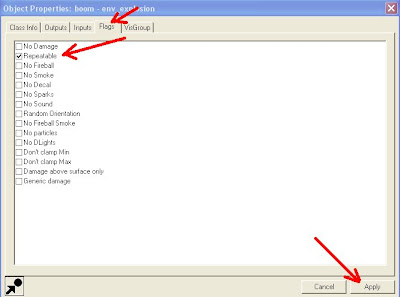

Also, if you want the explosion to go off more than once then go to the "flags" tab, and put a check mark in the checkbox next to "repeatable", click apply.
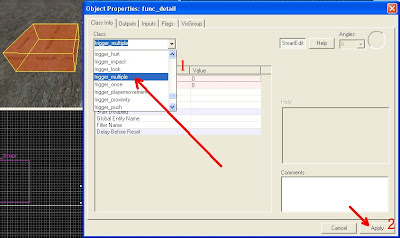

Trigger_Multiple


Now, we will use the trigger brush to explode the bomb. Draw the trigger brush and double-click on it, hit Ctrl-t on your keyboard. From the pulldown menu select trigger_multiple. Then click apply.
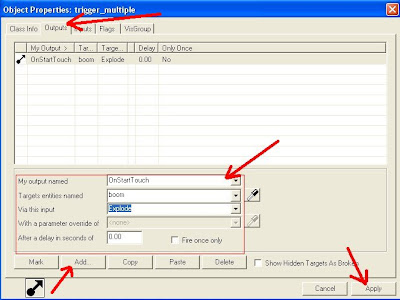
Now, select the "output" tab on the dialog box. Click "add"
Put on "my output named" - OnStartTouch
(that means when they touch the trigger the action will start)
"targets entities named" - boom
(that is the name of our env_explosion)
"via this input" - explode
(this is what you want the named entity to do)
"with parameter of override of" (not used)
"after a delay in seconds of" - 0.00
(this is used to delay the action should be necessary, for example if you set it to five, then five seconds after someone touched it, it would explode.)

After you change your settings, don't forget to click apply.
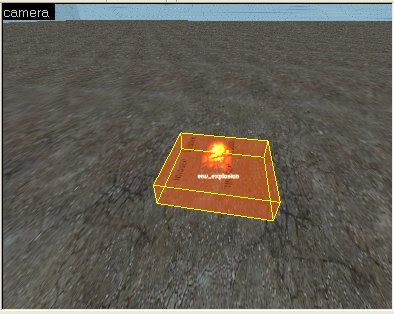

Arrange the trigger_multiple and the env_explosion like it is shown in the pic above. Now when you compile the map this will act like a little land mine, and when someone steps on it, it will explode. Compile the map and test it out. (Note: when you compile the map the trigger_multiple and the env_explosion will be an invisible, so you have to remember where they are to test it.)

Button


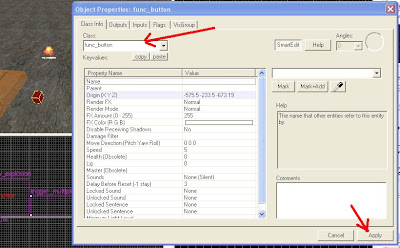
To make a button, draw a small brush using whatever texture you want. Double-click on the brush, and hit Ctrl-t on your keyboard. From the pulldown menu select func_button. Then click apply
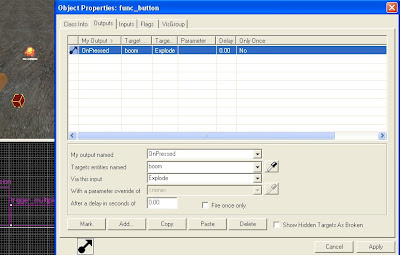

Now, select the "output" tab on the dialog box. Click "add"
Put on "my output named" - OnPressed
(that means when they press the button the action will start)
"targets entities named" - boom
(that is the name of our env_explosion)
"via this input" - explode
(this is what you want the named entity to do)
"with parameter of override of" (not used)
"after a delay in seconds of" - 0.00
(this is used to delay the action should be necessary, for example if you set it to five, then five seconds after someone pressed the button, it would explode.)

Click apply
Compile your map, press the button and watch the explosion.

logic_timer


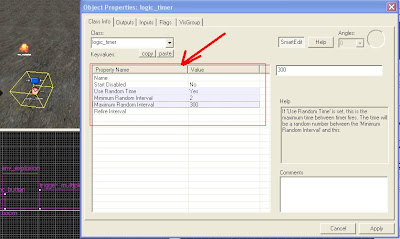
The final way to make a bomb explode, is to use a logic_timer. Select the entity tool, Choose logic_timer from the pulldown menu, and place it in your map. Next, Double-click on the logic timer.
Name - whatever
(you can give the name if you want to, but for this it is not necessary)
Start Disabled - no
(put no because, you want it to start active)
use random timer - Yes
(you want the bomb to be random, so you would say yes here)
minimum random interval 3 (the minimum wait time between explosions)
maximum random interval 100 (the longest it will wait to fire,)
refire interval (not used) (you would only used this if you were not using random)
( so anywhere between 3 and 100 seconds the bomb will randomly fire)
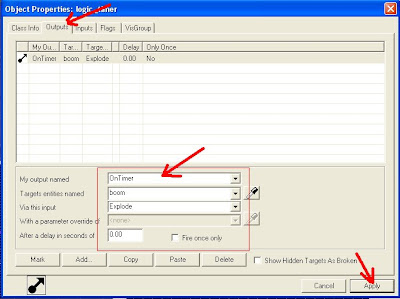

Now, select the "output" tab on the dialog box. Click "add"
Put in
"my output named" - OnTimer
(that means when the time is up the action will take place)
"targets entities named" - boom
(that is the name of our env_explosion)
"via this input" - explode
(this is what you want the named entity to do)
"with parameter of override of" (not used)
"after a delay in seconds of" - 0.00
(this is used to delay the action should be necessary, for example if you set it to five, then five seconds after someone pressed the button, it would explode.)

Click apply

Compile your map, and watch the explosion.
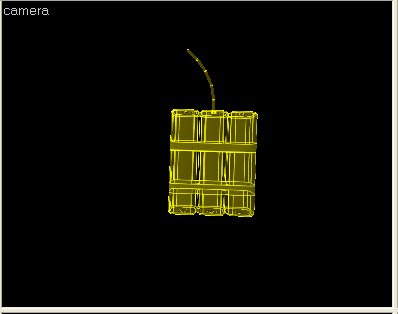

dod_bombtarget


These can be used to blow up walls and stuff.
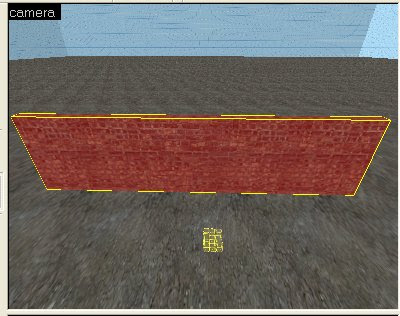

First, Select the entity tool, Choose dod_bombtarget from the pulldown menu, and place it in your map.

Then draw a brush using a brick texture and make a wall.
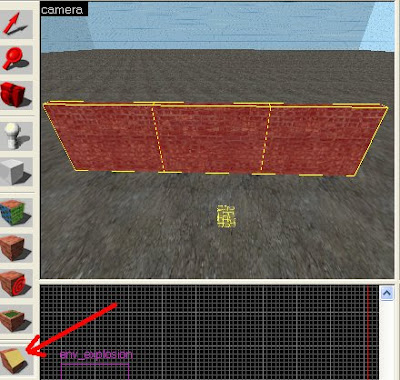

Use the carve tool and cut the wall into three sections.
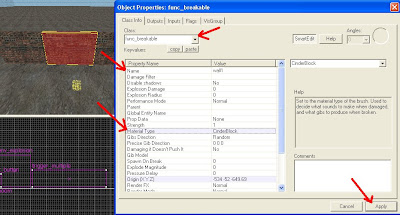

Select the middle section. Hit Ctrl-t on your keyboard, from the pulldown menu select func_breakable. Click apply. And give it a name, I named mine wall1. Change the material type to cinder block. Click apply
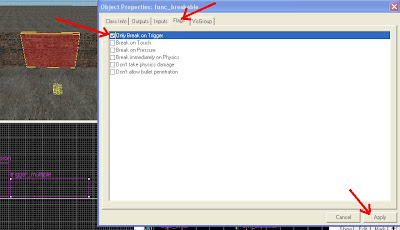

click the "flags" tab. Put a checkmark in the checkbox next to "only break on trigger" this way if someone shoots the wall or throws a grenade at it it will not break.

Click apply
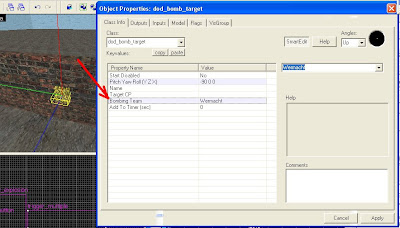

Place your dod_bombtarget next to the wall and line it up nice and neat. Double-click on your dod_bombtarget and select which team you want to be able to plant their bomb , then click apply.
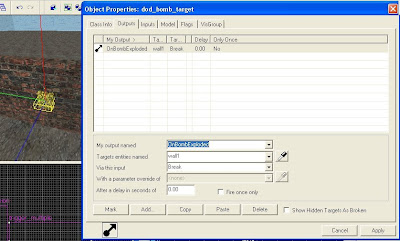

Now, select the "output" tab on the dialog box. Click "add"
Put in
"my output named" - OnBombExploded (that means when bomb explodes the action will take place)
"targets entities named" - wall1
(that is the name of our wall)
"via this input" - break
(this is what you want the named entity to do)
"with parameter of override of" (not used)
"after a delay in seconds of" - 0.00
(this is used to delay the action should be necessary, for example if you set it to five, then five seconds after someone pressed the button, it would explode.)
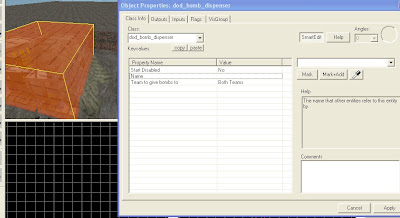

Now we need, Bombs for the players to pick up, use the entity tool to place a prop_static in your map. Double-click on the prop static and change the world model to "models/props_crates/tnt_dump.mdl" click apply
then using the trigger texture draw a brush enclosing the model of the TNT. Double-click on the brush and Hit Ctrl-t and change the trigger brush into a "dod_bomb_dispenser". Click apply and you are done.

Compile the map, join the correct team, and plant the bomb.
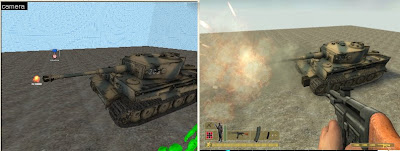


That's the basics, now you can be creative with it, for example you can put an explosion in front of the tank model, on a timer and it will look like the tank is firing.
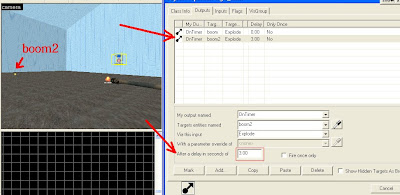

Put another env_explosion downrange from the tank name it " boom2". then dubbleclick on the timer select the "output" tab and click add. then add
"my output named" - OnTimer
"targets entities named" - boom2
"via this input" - explode
"with parameter of override of" (not used)
"after a delay in seconds of" - 3 (this way when the tank fires three seconds later the other explosion will go off and it will look like that's where the shell landed that the tank fired.)

Don't forget to check the "repeatable" checkbox under the "flags" tab on the env_explosion.

The rest is up to you.

Saturday, July 11, 2009

Lesson 13 - Water

If you are New to Mapping Click this link and start at the beginning.

Water -
How to make water in hammer.


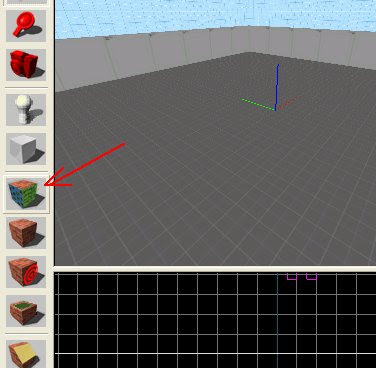
To make water first click on the texture tool.


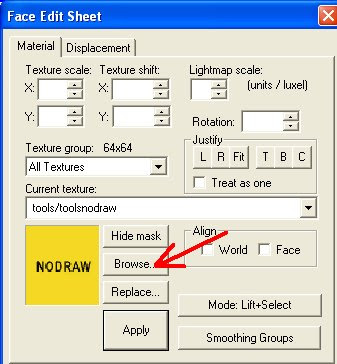
Then click browse.


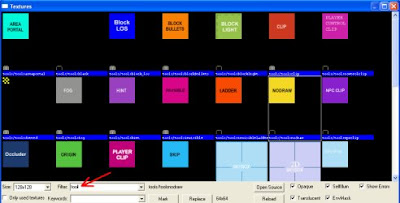
Type tool in the "filter" dialog box.


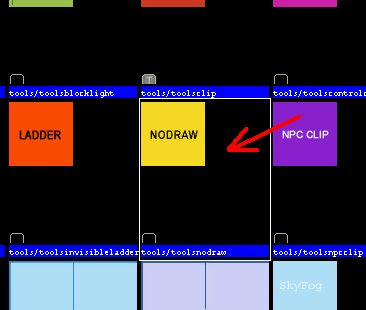
Select the nodraw texture. Double-click on it to select it.


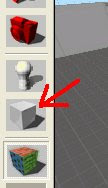
Select the block tool.


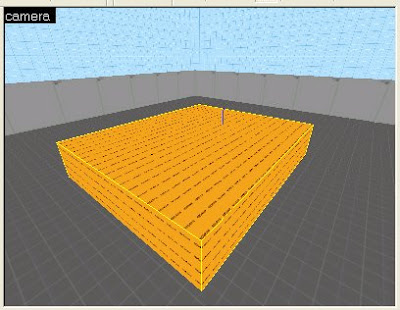
Draw a square brush.


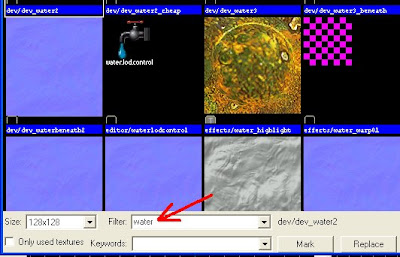
Click the texture tool, click browse and type water.


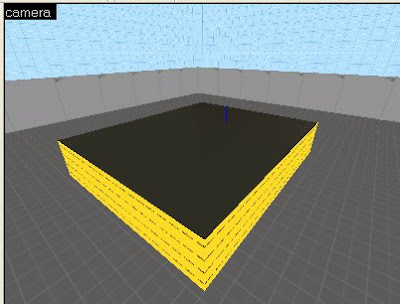
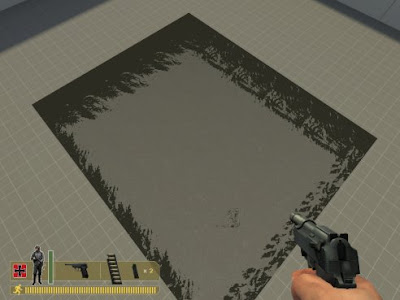
Select a water texture, and apply it to the top of the brush only. I used "nature/sewer_water001". The other sides have to stay nodraw. And be aware that not all of these water textures work correctly. So if the one that you choose doesn't look right, then select a different water texture.


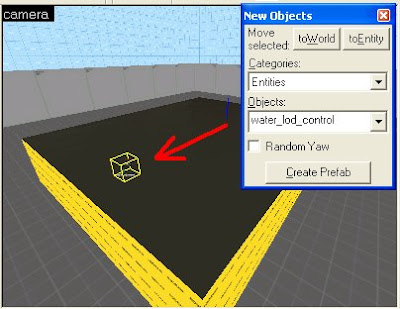
Then click on the entity tool.


And select water_lod_control in the objects pulldown menu. And place it above the water. water will work without this, but This makes the water look better. (you only need one for whole map)

Compile the map, and you have water.


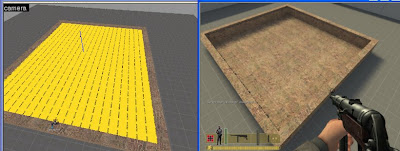
If you put the water in something like a swimming pool, it is important to make sure that the water brush lines up exactly with the wall of the pool or you will get some weird effects underwater. (used nature/water_anzio001 in example)

If you compile your map and you cannot see the water. Then you want to check your map for leaks. If you don't know how to check for leaks, see lesson 2 on how to fix leaks. Also an invalid brush might cause water not to show up. So if you have a complicated brush, or you did a lot of vertex editing, that can also be the cause.

Also know that some water textures are only made to be seen from above. If you swim in these waters when you look up you will see pink and purple checkerboards. So when you compile your map, make sure you check that out.
(For example: water_anzio001 can only be seen from above, and water_anzio001_cheap can be seen from above and below.)


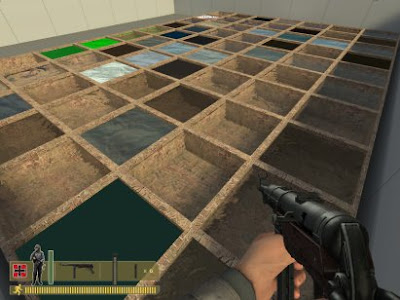
You can make a sample map with a bunch of little pools and use all the water textures so you can see which one you want to use.

GOTO LESSON 14

Saturday, January 31, 2009

Lesson 12 - Advanced Displacements

Now im going to teach you about displacements.
First, I will give you a little information. I am going to tell you some of the common mistakes people make.

If you are New to Mapping Click this link and start at the beginning.

This is advanced displacements, if you don't know how to create a displacement, read Lesson 5, First, then try the advanced stuff. Lesson 5 Displacements


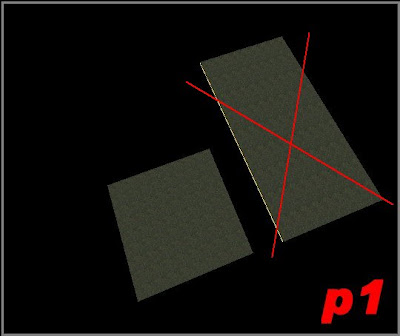
When creating displacements, the brush you use to create the displacement, should always start out as a square.(see p1)

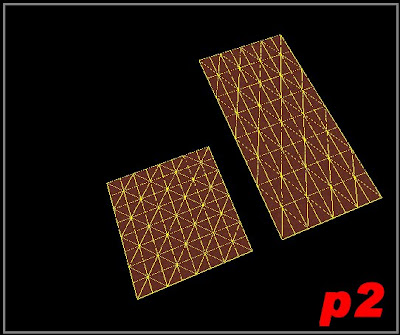
You can make displacements out of rectangles, but the vertices will be stretched out and that makes it more difficult, to line up the edges of your displacements.(see p2)

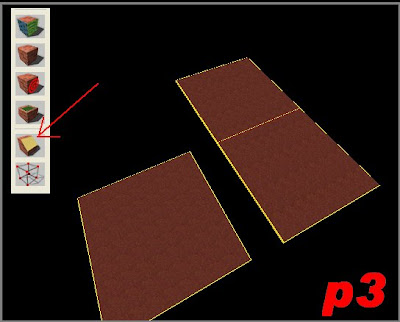
if you were going to make a displacement out of the rectangle, first you should cut it in half, using the carve tool, to make two squares.(see p3)

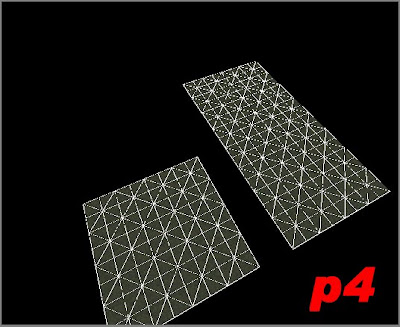
Then when you create the displacements, the vertices will all be square and easier to manipulate.(see p4)

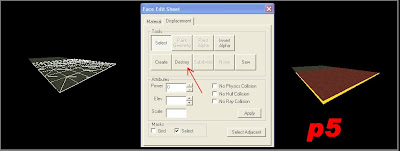
If you ever make a mistake, then you simply select the displacement, and click the destroy button. It will turn your displacement back into the original brush.(see p5)

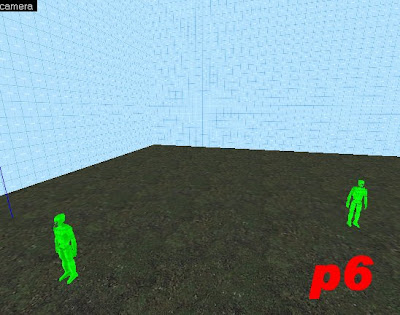
Let's say you are starting your map.

We have our skybox and a ground texture. (see p6)

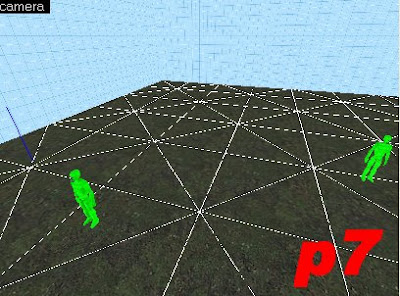
You can't just click on the ground and make a displacement out of it.(see p7)

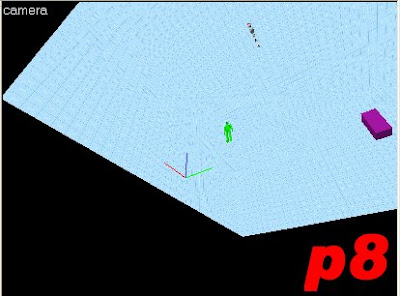
If you do, then your map will not seal. Displacements are not solid. They are solid to the player, but not to Hammer. As you can see from this bottom view.
(see p8)

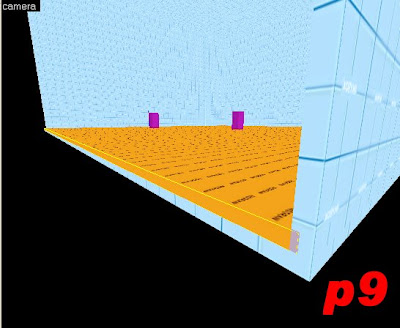
So if I were going to create a displacement, I would draw a new brush on top of the ground.(see p9)

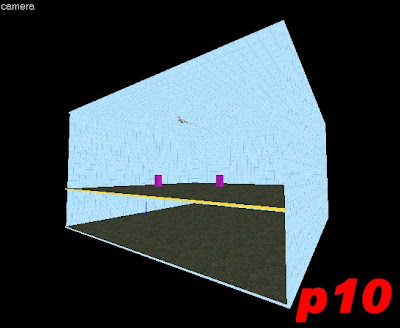
Then I would texture the ground, and move it up about 1/3 from the bottom. If you left it on the bottom then when you push the displacement down it would hit the wall of your skybox. So move it up to give yourself working room, then create your displacement.(see p10)(note: I removed the sidewall just for illustration purposes)

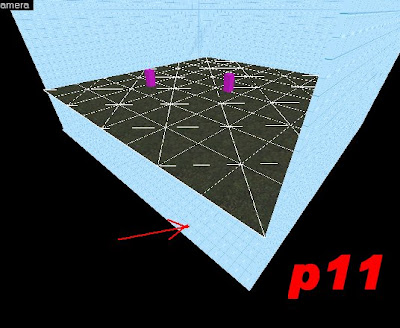
As you can see I created my displacement, then I changed the bottom texture back into the skybox texture. We do not need to waste resources drawing the bottom that we will never see. Take notice of the vertices. This was created using a power of three. You have a choice of 2, 3 and 4. Default is three.(see p11)

I do not know why anyone would use 2. Three is good for creating mountains and hills. Power of 4 is good for creating more detail in your displacements, such as blast craters, Roads, piles of hay or boulders.

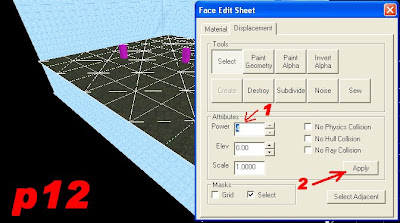
If you need to change the power of your displacement, after you have created it. Select the displacement, change the power in the face edit sheet. Then click apply.(see p12)

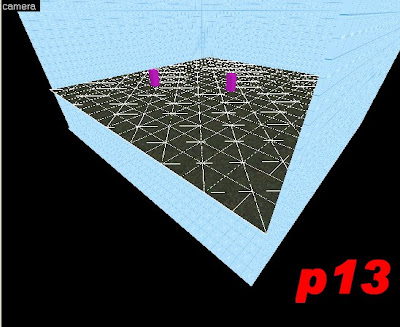
Now the vertices are smaller.(see p13)

Now you're ready to "paint the geometry". (That's another way of saying move the texture up-and-down.)

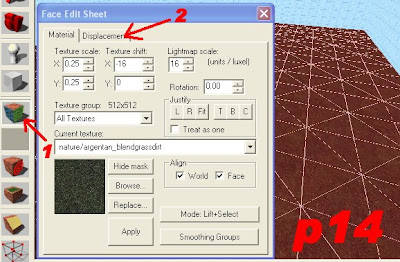
Click on the texture tool icon, then click on the displacement tab.(see p14)

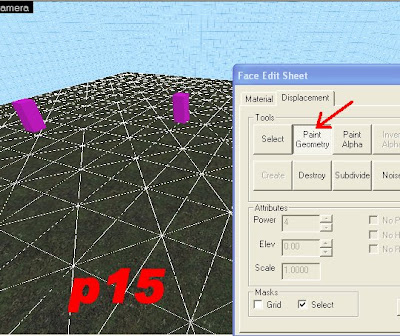
Select your displacement, then click the paint geometry button.(see p15)

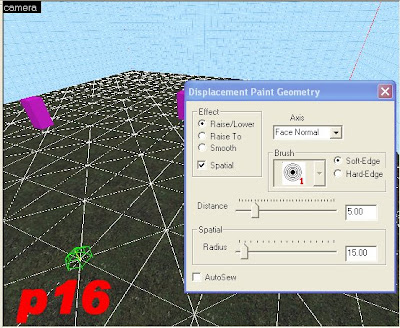
Now when the "displacement paint geometry dialog box" pops up, you'll see a little green wireframe globe that snaps from vertices to vertices. The globe cursor lets you know which vertices you are about to manipulate. I'm sure you can figure that out all on your own. Some people can't, so I have to say it. On the dialog box in the "effects" field, make sure the radial button next to "raise/lower" is selected. And the box next to "spatial" has the checkmark in it.(see p16)

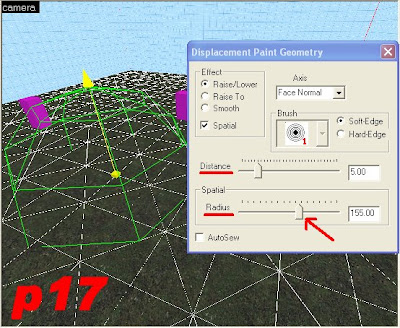
On the dialog box you can see, "distance" and "radius". Distance is how far up-and-down you want the displacement to move per click. Five is good for that. Radius controls the size of the green globe. The bigger the globe the more vertices you can grab at one time. 155 is good for that.(see p17)

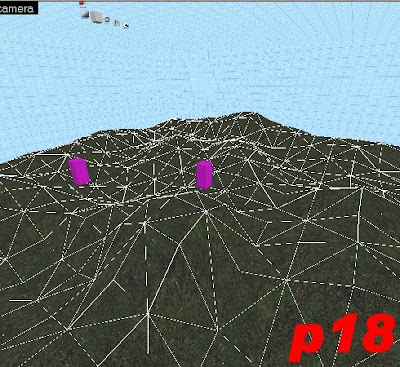
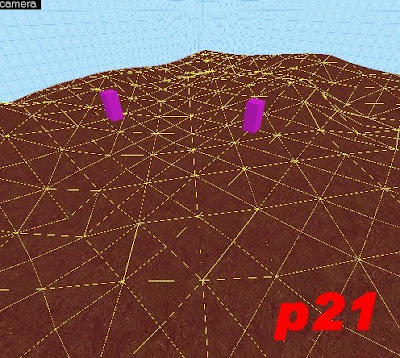
Paint the geometry, move stuff up in some areas, and push it down in others. Do not worry if it looks all crappy and pointy.(see p18)

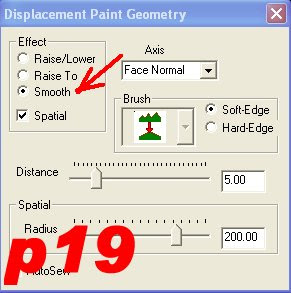
You can get rid of all the pointy and sharp corners, by using the "smooth" option in the "effects" field on the "Displacement Paint Geometry" dialog box.(see p19)

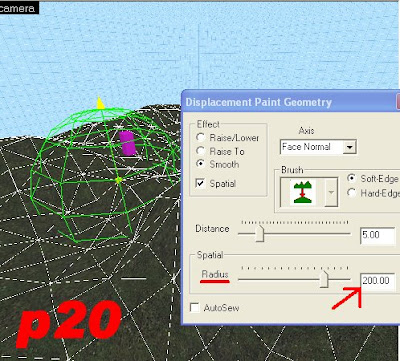
When using the "smooth" option, you want to make the radius larger than it was when you created the hills and valleys. The the radius was 155. Now I moved it up to 200.(see p20)

Each time you click, it's smooths out the vertices a little. So the more you click, the more smoothing you'll see.
After you smooth them all out you're pretty much done with that.

And it looks much better

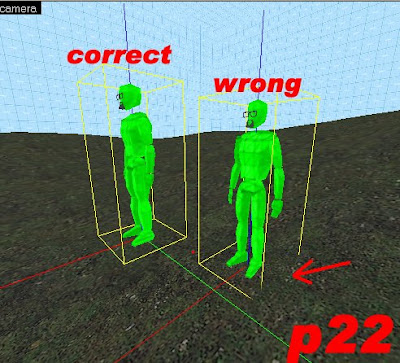
When you're ready to place your spawn points on a displacement, you must be very careful. You must take note of the yellow "bounding box" that surrounds the spawn point avatar. If you simply place the spawn point on top of the displacement, more than likely it will not work because part of the bounding box goes into the displacement. Hammer will detect an error and delete the spawn point. So after you place each avatar, on a displacement. You need to move them up a little, so that you can see the complete bounding box surrounding the spawn point avatar.(see p22)

The neat thing about displacements is, some of the textures have 2 textures in one. They are called alpha channels. All the textures that have the word "blend" in the title, are textures that use alpha channels. Alpha channels are used to give your displacements a more realistic feel. Some alpha channels change grass to dirt. Some change rock to grass. Some make the grass grow and make the grass go flat. You have to try them out to see what the alpha channels do.

To paint alpha channels click on the texture icon, the green rubic's cube.
Click the displacement tab.
Select your displacement.

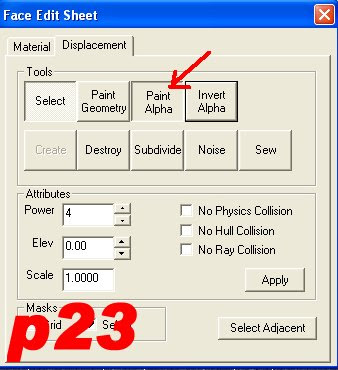
Now instead of clicking "paint geometry", click "paint alpha".(see p23)

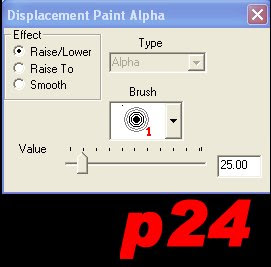
On the "Displacement Paint Alpha" dialog box, make sure raise/lower is selected in the "effects" field.
"Brush" - controls the size of the paintbrush.
"Value" - controls how much paint will be applied with each click of the mouse. You can set these to what ever works for you.(see p24)(Note: You can hold the mouse button down and move the mouse around on the displacement to paint it.)

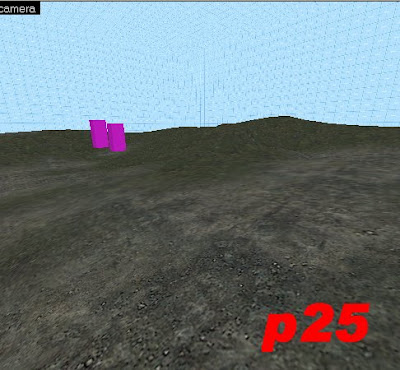
Go ahead and paint alpha. You can use alpha to create trails, roads and such.(see p25)
(note: the invert alpha button switches between alpha channels, try it and see what I mean)

Now I will explain why you want to create your displacements from brushes that were square.

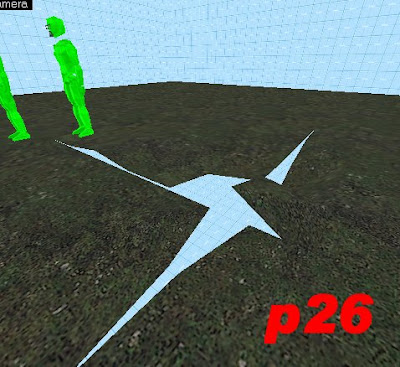
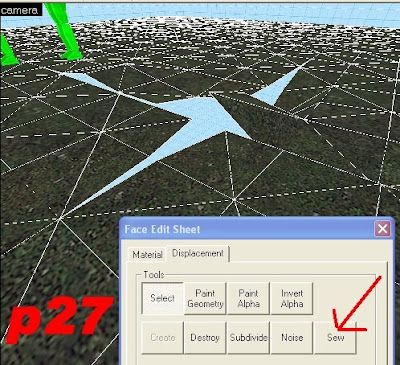
Let's say you have finished painting the terrain up-and-down. And then you notice a hole in your terrain where two or more displacements meet.(see p26)

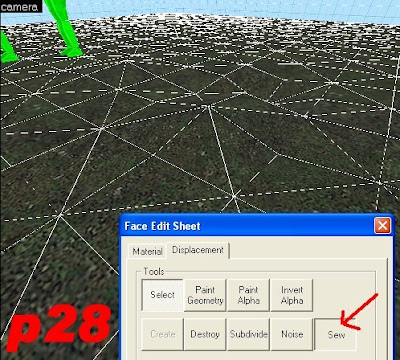
To fix this error, you need to use the "sew" option. Select all the displacements surrounding the error. Then click the "sew" button.(see p27)

"Sew" will automatically connect the displacements, If your displacements were created from squares, and are the same power.(see p28)

Sometimes, the textures will not lineup automatically. This can be caused by displacements that are of different powers. Or the original brush is a different size square from the one you are trying to connect to.

If this is the case, you can correct this error by making a patch out of another displacement.

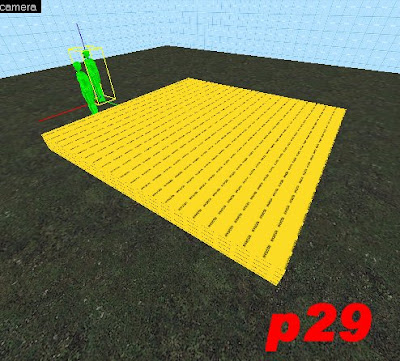
To do this, draw a brush completely covering the hole even overlappingly a bit on the edges.(see p29)

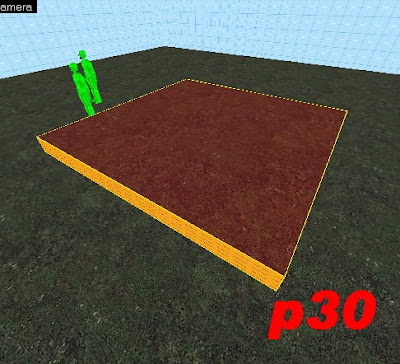
Texture the top of the brush the same as the ground.(see p30)

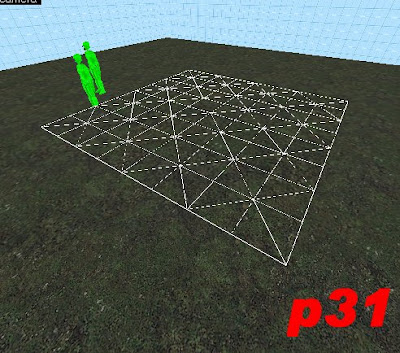
Then create the displacement.(see p31)

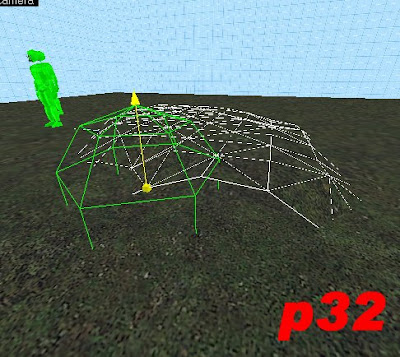
Using the paint geometry option, pull the edges down(see p32)

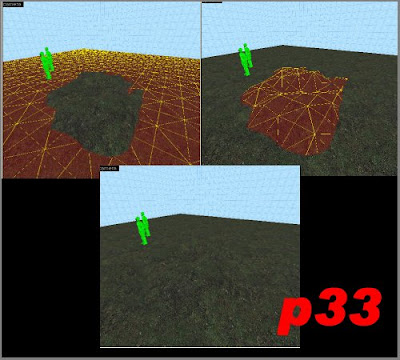
Play with it until you camouflage the error. People who play on your map, will never even know what happened here.
If I didn't have the patch highlighted you couldn't even see it. (see p33)

You can also create realistic looking rocks or boulders.

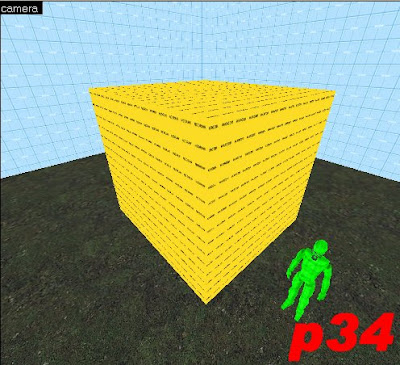
Create a brush slightly larger than the rock you wish to create.(see p34)

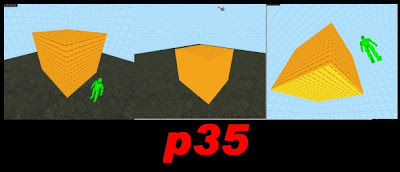
When you are ready to create the displacements, Select all sides of the brush except the bottom.(see p35)

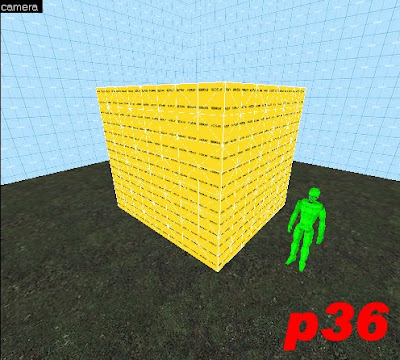
Create your displacement.(see p36)

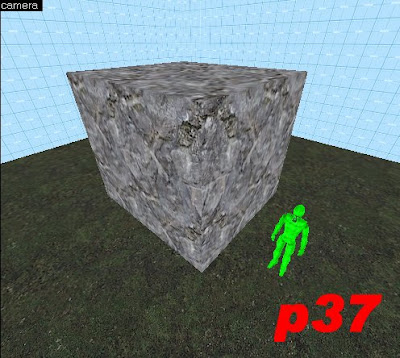
Texture your displacement using a rock texture.(see p37)
(note: textures that have the word "model" in the title, will show up black in your map, when looked at from certain angles, don't use these.)

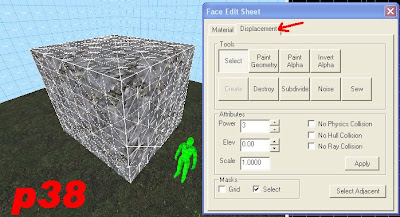
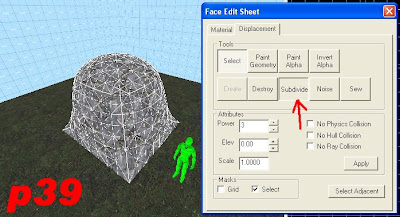
Select the "displacement tab" on the "face edit sheet" dialog box. Select all sides of the brush.(see p38)

Now, click on the "subdivide" button. It rounds out all the corners. As you can see.(see p39)

Now, all you have to do is use "paint geometry" to push the displacements up, down, back and forth.
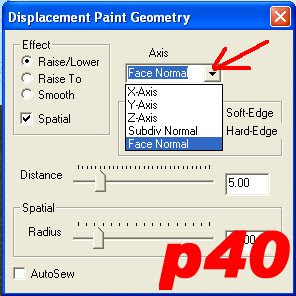
Take a look at this pull down menu.(see p40) This is where you can change the direction in which the vertices move. "Face normal" is default. It is up-and-down. The x-axis and the y-axis move the vertices back and forth or in and out. The z-axis is up-and-down, just like "face normal".

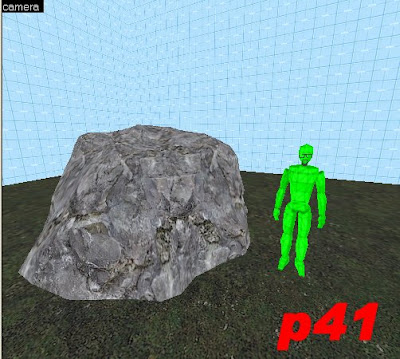
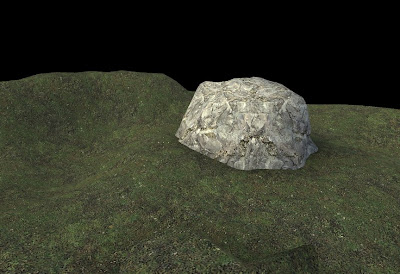
Try changing these values, paint the geometry and make the brush look more like a natural rock.(see p41)

I have a video you can watch, that will show you how to create cliffs.

Pupsters Day of Defeat Mapping - For more funny movies, click here
I hope you have fun, and learned little bit.

If you make a map that you think is good enough, send it to me.
If I like it, I'll play it on my server. sourcemapping@northstardesigners.com

GoTo Lesson 13 - water