Friday, June 27, 2008

Lesson 9 - Map lighting - Sunset and Night

Map lighting, lights, light_env, env_lightglow, light_spot, point_spotlight

If you are New to Mapping Click this link and start at the beginning.
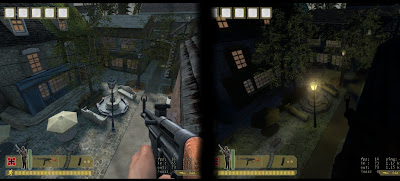


Lighting your map is very important. You can control the time of day. You can even make it night.

Let me illustrate how Hammer interprets lights.
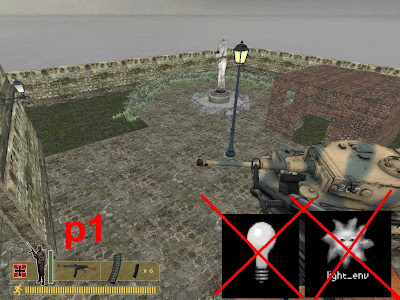


If you do not have any lights, or a light_env. Then your map will be flat, with no shadows, and the insides are lit the same way as the outsides.(see p1)
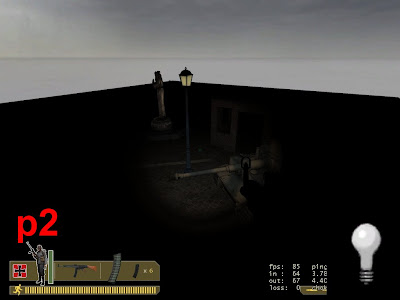


If you have a light in your map but you do not have a light_env. Then your map will be totally dark.
(Except where you put a light)(see p2)
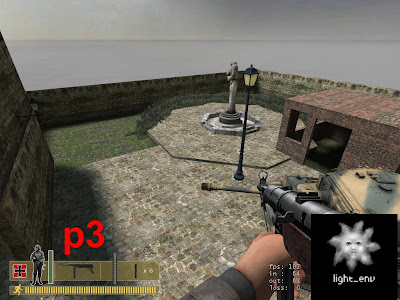


When you do have a light_env in your map, then your map looks correct. The outsides are bright. The insides are dark. And you can see shadows. It looks much more realistic.(see p3)

Adjusting light settings

If you don't know where to get your light_env then .click here and read (near p52)adding sunlight. Then use your back button to get back.
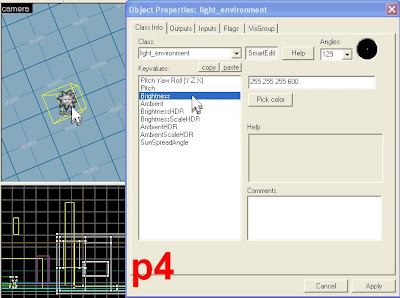


Double-click on light_env. On the "object properties" dialog box, click on brightness.(see p4)
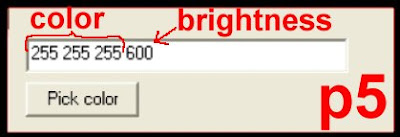


To the right, you will see some numbers. The first three set of numbers represent the color. The fourth set of numbers is the brightness.(see p5). Default brightness is 200 I set mine to 600 to make it bright. You can change the color by clicking pick color. That's pretty much self-explanatory. Picking a color does not affect the brightness.
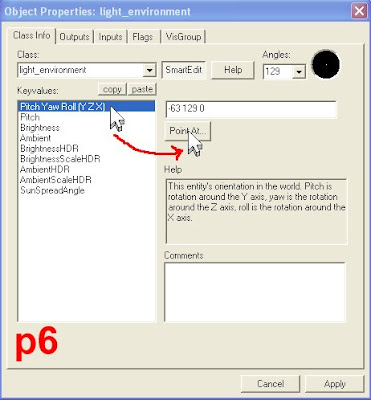


You can change the angle that the sunlight will fall by clicking "pitch yaw roll", then clicking "point at" (see p6)
your mouse pointer will turn into a "target scope" that is used to set the angle by clicking somewhere in your map.


You can also Control the brightness and color of the light bulbs. (see p7) the same way.
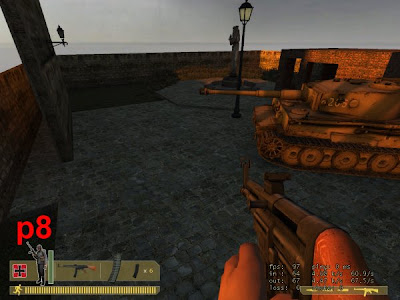


To make my map look like sunset, I changed the color of my light_env to orange. I left the brightness at 600. And then I set the angle real steep to make the shadows longer just like in real life.(See p8)
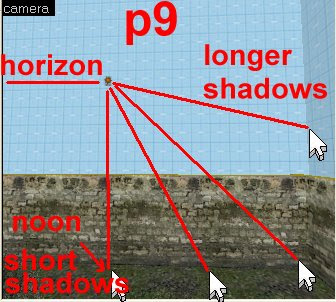


The angle is set depending on where you click and where the light_env is. (see p9)
if my light_env is right there and I click directly underneath it, then we have the noontime sun, with very short shadows. And as you swingout the the lengths of the shadows increases with the angle.

Making your map nighttime.

To make your map nighttime, you have to delete the light_env. Then add the moonlight in by hand.


To make realistic moonlight use the little light bulbs. You want to place it in your map, double-click on it to bring up the properties dialog box.(see p10) Notice in the sample how high off the ground that I placed my light. It's about three feet above the light pole.
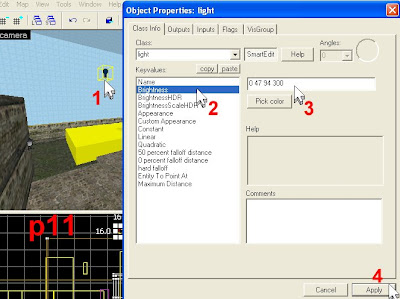


Then double-click on the light. In the properties dialog box click on brightness.Use these numbers 0 47 94 300. Put those numbers in the text field, then click apply. The light bulb should have change colors.(see p11). It looks black but it's a cool blue. Makes perfect moonlight.
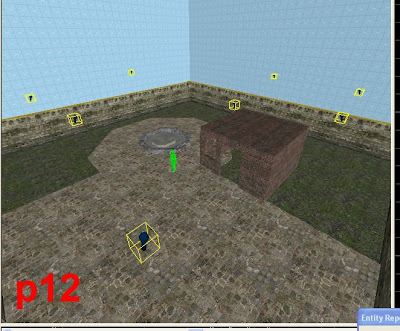


Once you set up the light bulb. Simply copy and paste it all over the map where you want to moonlight to shine.(see p12)
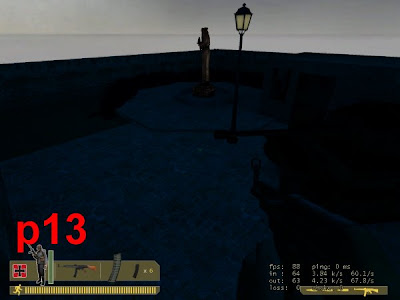


Compile the map it should look something like my sample (see p13) you can control the brightness of the moonlight by using the techniques above, and changing the 300 to a higher number.
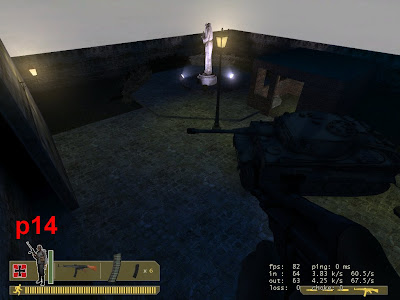


Don't forget to add normal lighting inside your houses and buildings. And you can add outside lighting such as in my example.
(see p14)

Examples of the outdoor lighting models used in this example.

The light pole.
models/props_urban/lights_streetlight01_on.mdl
env_lightglow
2 light_spot

A lot of the lighting fixtures have two models of the same thing. Some use skins. One of them is turned on, and one of them is turned off. This light pole has two models so use the one that is lit.
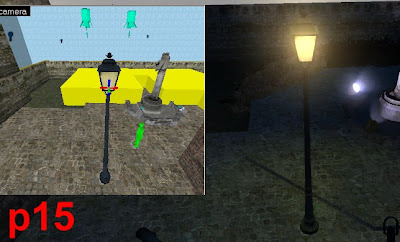


I use the env_lightglow to add a glow to the light that kind of foggy haze that you see around lights at night. The light_spot is the same thing as a spotlight, and you can adjust the brightness and angle on the spotlights just like the light_env. Arrange them like I did in my sample. (see p15)

The wall mounted light.
models/props_urban/light_fixture01.mdl
env_lightglow
light (set at 255 255 164 30)
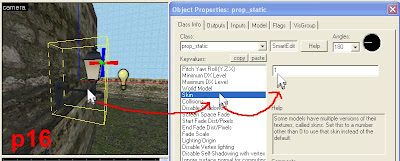


Most outdoor fixtures have two models. But this one uses skins. Some models have more than one skin. Double-click on the light fixture, click skin change into 1, click apply.(see p16) It changed the skin to the nighttime model. Some skins change to snow/non snow. But for lights it's usually on and off.
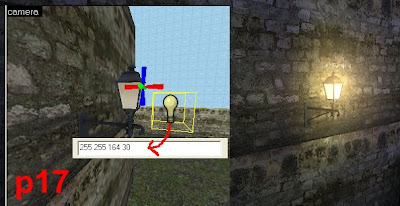


Put a light entity in front of the model and a env_lightglow also just like in the sample.(see p17)

(env_lightglow property settings.
Parent - blank
name - blank
pitch yaw roll - 0 0 0
color - 255 208 128
vertical size - 30
horizontal size - 30
maximum distance - 50
minimum distance - 200
outer maximum distance - 700
glow proxy geometry size - 15
HDR color scale - 1.0)

The stage spotlight.
models/props_wasteland/light_spotlight01_lamp.mdl
(for this model skin 0 = on and skin 1 = off)
point_spotlight
light_spot
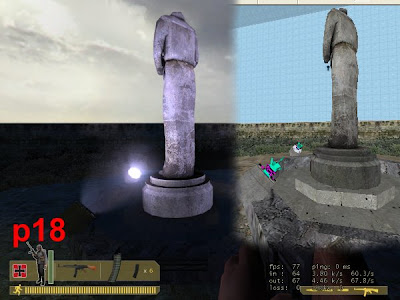


The same deal. Place them in your map use the "pitch yaw roll" to point the model at the statue. Then copy and paste the numbers you get for the "pitch yaw roll" of the model into the "pitch yaw roll" of the point_spotlight and the light_spot. That way we can be sure that they are all pointing in the same direction. Then line them up neatly like I did in my example. (see p18)

Have fun, but remember not to make your map too dark, because it's not fun if you can't see. Sure we have flashlights, but no one wants to use them. Maybe if there's a darkroom, yeah. But not during the whole map/game.


Note: when placing lights inside buildings you should not make the lights too bright just think of the numbers as Watts. 100 watts is bright enough 60 watts 30 watts and 20 watts the're all good for inside lighting.(example: 255 255 255 30 = 30 watts light bulb)

GOTO Lesson 10

Saturday, June 14, 2008

Lesson 8 - Ambiant sounds

Ambiant Sounds

If this is your first visit to this sight you should start at the beginning.


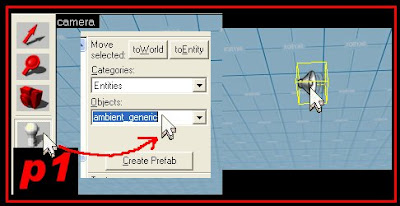
Click on the entity tool, select ambient_generic. (See p1) Paste it into your map.
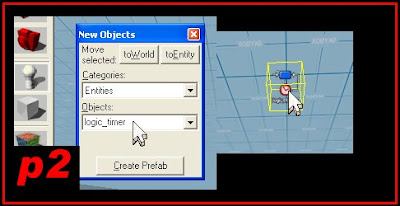
also paste a logic_timer (see p2)


Paste into your map. I paste things like this on the ceiling or sky, so that you can find them easier, if you need to. Like if you were making a new map and you wanted to use the same sounds. All you have to do is copy them from this map and paste them into your next map. So you might as well make them easier to spot.


Double-click on the ambient_generic. Select name in the key values:, give your sound a name. I named mine "boom".
(see p3)


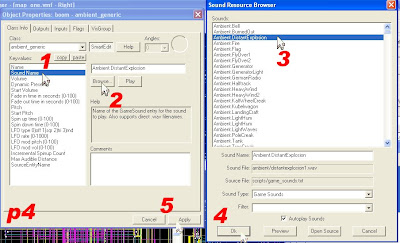
Select sound name, click browse, select "Ambient.DistantExplosion", click OK, click apply. (see p4)


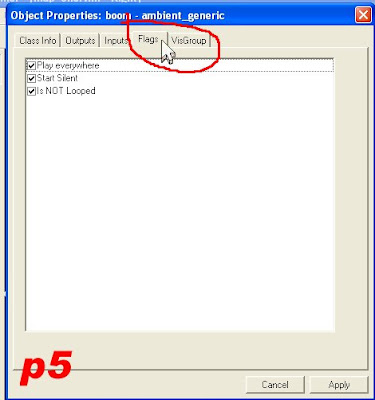
Click on the flags tab. (see p5). Make sure all the checkboxes are checked. Click apply, then cancel

Double-click on the logic_timer.


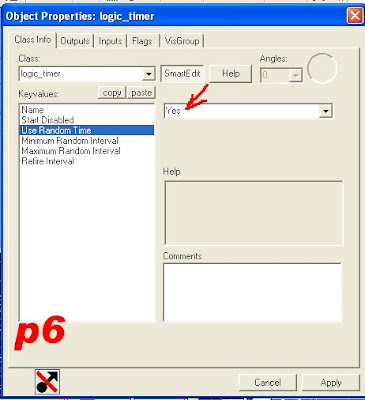
Select "Use Random Timer". Make it say yes. (see p6)


Select "Minimum Random Interval". Make it 5 (see p7)


Select "Maximum Random Interval". Make it 200 (see p8)


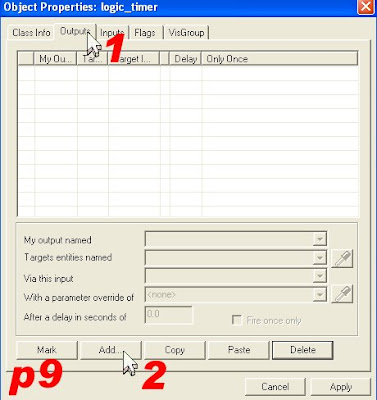
Select the outputs tab. Click Add (see p9)


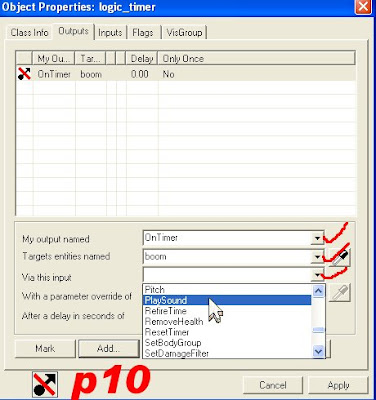
Click the pulldown arrow next to the fields (see p10), in the first one put "on timer", in the second one put "boom", because that was the name of our sound. The last one is what you want it to do. So select "play sound". Click apply, then click cancel.

You may want to add more sounds to give it a battlefield effect.

All you have to do is copy and paste, then change the name on the ambiant_generic and the logic_timer and change the sound, you can add wind or airplanes.


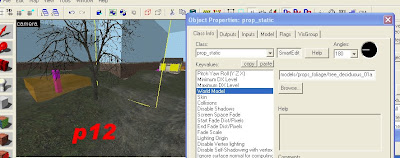
Finally, we should add some trees. I do not like to add trees until the end. Because they clutter the map. Copy and paste a prop_static. Double-click to open its properties. Click on collisions and make it solid. (see p11)


Select "world model", click browse, type tree in the filter. Look for "models/props_foliage/tree_deciduous_01a.mdl".
Click OK, click apply. (see p12)

You already have sandbags, crates and bushes, and now you have a tree. Just copy and paste everything all over the map. You can even copy and paste the houses. You can put furniture in the houses just select world model, browse, type furniture in the filter.

I hope this series of lessons was helpful in getting you to make your first map. My next series of lessons will teach specific functions. For example how to make fire, how to make ladders, how to make water, how to make a 3-D sky box, how to make buttons do things, how to make explosions and much much more. So if you have any special requests. Just post them here. Or you can e-mail me at sourcemapping@northstardesigners.com I want to thank you for sticking with me, and helping me make DOD more exciting because of all the new maps that you are going to make. Don't forget to give me credit where credit is due. And tell your friends about this web site, so they can learn how to make maps just like you did.

Goto Lesson 9

Lesson 7 - Team wall, Flags

Lesson 7
team wall, flags

If this is your first visit to this sight you should start at the beginning.

Just about ready to wrap this up. There will be one more lesson after this. You are doing a great job.

First thing we should do is set up the map for gameplay. Open the entity report. Click on map, select entity report. The entity report shows you everything that you put into your map. It allows you to find things more quickly than trying to fly around and look for them. Now when we flipped our map we copied everything in the map. So now we are going to use the entity report to clean up those extra items that were copied, and that we did not need.


For instance, there should only be one light_environment per map. So select one of them in the entity report. And click delete. Then click OK. (see p18) Also delete all your spawn points, and close the entity report. We deleted them so, we can reinsert them without fear of mixing up the spawns. Also we need to put 16 spawn points for each team. That adds up to 32 players total. That will allow your map to be played on most servers. If you only have five spawn points in your map then only five players can join your game. Pick which spawn you want to be allies and pick which spawn you want to be axis. And add the spawn points.


See the example (see p19), I created my spawn with eight spawn points on the outside, and eight spawn points on the inside. Something you need to remember about placing spawn points on top of displacements. If you just placed them in their and leave them some of your spawn points will not work because displacements are not solid. Some of the spawn points get stuck in the ground. And if they are stuck in the ground hammer will ignore them. So once you placed your spawn points. You should use the entity report, to select all your spawn points and move them up a little bit to ensure that they are not stuck in the ground.


Here's what you do:
Open the entity report.
Select the first info_player_axis. (see p20)
Holddown the shift key and select the last info_player_axis, this will select all spawn points in between the two points. (see p21)
with all the spawn points selected go to your side view viewport and move all the spawns up off of the ground at the same time.


As you can see they are all off the ground and none of them are touching the displacements. (see p22).

Do the same for both sides, both spawns.


Now we need to add spawn protection. Turn the "IG" button off. We will use another "tool" texture. Select the "texture tool", click browse, type tools, select the "trigger texture". Go into the large house, where we created the spare room. Let's block this doorway so that the enemy team cannot enter this spawn. Draw a brush using the trigger texture and completely block the doorway. (see p23).

Here's another one of those really important shortcuts. Ctrl-t. Learn this one. This will be the most important shortcut in your Hammer mapmaking career. Ctrl-t is used to turn brushes into Brush Entities. So we're going to turn this brush into a team wall. So make sure the brush is selected. And hit Ctrl-t.


Select "func_team_wall" from the pulldown menu. (see p24)


Select "team to block" in the "key values" field. Then on the pulldown menu select the team you wish to block. In this case I am working at the Axis spawn so I am going to block the Allied team. Click apply, click cancel
(see p25)


Also place team wall at the fence exit. (see p26) I made this wall extra tall, to prevent people from boosting over the fence.

Add team walls to both sides.

Flags.
Adding Flags.
Select the entity tool.


From the pulldown menu select dod_control_point_master. In placed anywhere in your map. For your flags to work right, you need to have a dod_control_point_master in your map. Just one. And it can be placed anywhere. (see p27)


Then from the pulldown menu select dod_control_point. And place it were you want your flag to appear in your map. (see p28)

To create the capture area, we use a trigger brush. Use the texture tool, click browse, type tools, select the trigger texture. Draw a cube around the flag. This will be the capture area. As soon as someone enters this area they will begin to cap the flag. Make it as big or as small as you want.


After you get it the size you want, Hit Ctrl-t and select dod_capture_area, from the pulldown menu. (see p29) click apply, then cancel.


Double-click on the flag. Bring up the properties dialog box. Click on name in the "key values", and give your flag a name. I named my flag, flag1. Click apply. (see p30)


Select "Localized name to print on the" in the "key values". This is where you put the name that will pop up in the game when someone caps the flag I called mine Axis First. (See p31)


Select "sound made when axis capture" click browse, type voice in the filter. Select "Voice.German_FlagCapture". Click OK, click apply (see p32)

Select "sound made when allies capture" click browse, type voice in the filter. Select "Voice.US_FlagCapture". Click OK, click apply (same as above except for allies.)


Select "index of this point (unique)" and place a 1 in the text field. (See p33) this point number has to be different on each flag. That's why it says unique, duh. And this determines the order that the flags will appear on the HUD (hud stands for heads up display). Since this is our first flag, we are going to put a number 1. On the second flag will put a number 2. On the third flag will put a number 3. See how that works. So those twelve years of high school wasn't wasted after all.


That sets up the flag portion. Now we have to set up the capture area. Double-click on your capture area to bring up the properties dialog box. Click on "name of the control point area". Tie the name of the flag that we want to connect this control area to. In this case it is flag1, because that was the name of my flag.(see p34)


You don't have to change any of the other settings. But you can to make the game play a little different.
The other selections are pretty much self-explanatory. But if you cannot understand them, then don't mess with them. That flag is complete.

Don't forget to save your work often.

You might even want to save a backup copy of the file you're working on, just in case something goes wrong you only have to go back as far as the copy, and not all the way back to the beginning.

OK, that was one flag. Most maps have 5 flags. This is a small map. So it only needs three flags to keep it interesting.

Once you have one flag in the map, there is no need to go through all of that again. Why not just copy and paste. In fact I copy and paste all my flags, for all my maps. I only made one set for my first map. And then I copy and paste from then on. This is only the second time I made a flag from scratch. Just to show you guys how to do it. Like I said, once you have one, all you have to do is copy and paste the rest.


Let's copy this flag and capture area and make another flag. Because this map only has three flags, the next flag is going to be our middle flag. So let's put it in the middle. Make sure the ignore groups button is not on. Select the flag and the capture area. Click ctrl-c to copy. Go to the middle of the map. He Ctrl-v to paste. (see p36)

After copying the flag you need to change a few settings to make this flag unique.
------------------------------------------
Double-click on the flag,
changed the name of the flag to: "flag2"
changed the "localized name to print" to: Middle Flag
change the index of point to: 2
and that is it for the flag.

Double-click on the capture_area
change the "name of the control point this area" to flag2
now this flag and capture area are complete.
-------
Copy the flag one more time put it near the Allied spawn.
-------
Double-click on the flag,
changed the name of the flag to: "flag3"
changed the "localized name to print" to: Allied First
change the index of point to: 3
and that is it for the flag.

Double-click on the capture_area
change the "name of the control point this area" to flag3
now this flag and capture area are complete.
-------------------------------------------
When you're copying flags, never have the IG button on. It should always be in the up position, which is off.
Or it will ignore all the flag settings when you paste it.

Well this map is almost complete. Go ahead and Compile It and check it out. And we will be sure and finish this map up, in our next lesson.

GOTO Lesson 8

Lesson 6 - Flipping the Map

Flpping the Map


If this is your first visit to this sight you should start at the beginning.


In This lesson were going to learn how to flip the map. Before we flip the map, we need to add stuff in this empty area. Let's practice with some more displacements. When creating displacements, you want to keep the brushes that you create the displacements from as square as possible. They make for the best displacements. (See p1)


Start by drawing a fairly large brush. (See p2) Remember to start with the nodraw texture. It is OK if the brush overlaps into the houses a little bit. We are going to push that side down, with the texture tool. Select the texture tool. Match the grass textures.
(Select the texture tool. Left click on the grass to select the texture, right click on the top of that brush to apply the selected grass texture.) (See p3).


Click the displacement tab on the texture dialog box. Left click on the top face of the new brush to select it. (See p4)


Click create, click OK. (See p5).


Click on paint geometry (See p6).


Use the same settings I used (see p7).


See all the triangles we created. Those are called vertices. If the vertices are too large, it would not be a natural effect. I think these might be a little too large. (See p8) So we can change these vertices and make them a little smaller.


To change the vertices look in the attributes section, change the 3 to a 4 (See p9) then click apply. See how the vertices got smaller. That will allow us to have more control.

Then go ahead and start painting the geometry, make sure you move everything down that is in front of the house. Add hills to break up the terrain. and To give people hiding places. Just go ahead, and move things up and down. To make the ground look more natural. Then select "smooth" on the effects field. Enlarge the radius. And smooth out the displacement. Let me know when you are done.


After you smooth out the displacement, you can paint the alpha channels, if you like. But you do not have to. You can try to make yours look something like mine, because your imagination is probably not working right now, because you are in a learning mode. So you can just look at my example, (See p10). And try to make yours look similar, something like that. But it does not have to be exact. That's the beauty of that all. It's art.


Once you're done with that, we are ready to flip the map. Zoom out in the TopView viewport. Select everything. (See p11)


Using this select copy method, copy the entire map to the left. (See p12)


We want to make this into a mirror image. So leave the new copy selected. Go to the pulldown menus, click tools, flip objects, horizontally. Or you can just hit Ctrl-L. that should flip our copy in a manner that will cause it to be a mirror reflection of the world we created.(see p13)


We have both sides of our map created now. Wow. Good. We need to connect these two halves now. We need to create another map area, that connects these two areas. In the TopView viewport draw a brush the same width as these brushes. Line everything up the way you were taught. (see p14)

Make the new brush hollow, at about 32 units. And paint the inside just like the inside of the other two is painted. Don't forget to slice the brush at the same level that we sliced our original brush to create the border walls.

Now we need to open up the walls in connect all three areas of our map. Turn the ignore groups button on. Select the back wall, and delete it.

Select the wall behind the wall we just deleted. And use the grips from the TopView viewport to drag it open, and create an opening.


Add textures to the newly exposed nodraw textures. (See p15).


Now, do the same for the other side. Check the displacement were the wall used to be it may need to be pushed down in some places.

Now let's create a displacement for the new area of our map. Draw a brush to cover the whole grassy area. (See p16)
make sure you draw a new brush and don't just try to create one out of the ground that is there. You will cause a huge leak


Before you create a displacement out of this brush let's slice this brush in half. Because two squares make better displacements than one rectangle.
(See p17)

Create the displacements using a power of 4. Then paint the geometry. Add hills and such.

After painting the geometry, and smoothing the geometry. Then compile your map. And because we cut into the skybox to connect all our pieces of the map. We need to check for leaks. Do you remember how to do that. All right I will tell you. Go to map, load pointfile. If you don't know what to do from there, then go back and read the previous lessons

GOTO LESSON 7