
 Creating Your First Room:
These are what we call your tool textures. These are all special textures that are applied in specific situations. To select a texture. Double-click on the one you want. Right now you want to select the nodraw texture. Double-click on the nodraw texture. In the texture dialogbox, you can see that the nodraw texture is now selected. Click on the "block tool".(The tool above the texture tool on the left.) The texture dialogbox should have minimized itself to the column on the right. That is okay. You can see the nodraw texture is still selected. It is important to note which texture is selected before you start to create brushes in Hammer. A brush is the same thing as a block. But in the world of Hammer we do not call it a block. We call them brushes. You want to create most of your brushes using the nodraw texture. Any face of any brush that has the nodraw texture on it, is not drawn by Hammer when the map is compiled. This way when we texture the map, we will only have to texture what the players sees, and we save space in MB's by not having the computer draw areas of the map that no one will ever see.
Now we will create our first room, by creating a brush, in the "TopView" viewport. That is the viewport in the top right corner of Hammer. (Note: If you hover your mouse in the top left corner of each viewport you'll see the name of that viewport.) With the block tool selected, and the nodraw texture active in the "texture group" on the right, you are ready to start drawing in the "TopView" viewport.
Click in the viewport and hold the mouse button down. Drag a square 300 by 300. Put your mouse in the center of the square until your mouse cursor turns into the four arrows. Then drag the square to the middle of the viewport. Notice you can see the white dotted outline of the square you just drew in the bottom two viewports also. (If you can't, don't worry, it will work out.) Here is another shortcut that you'll need to remember. Hit "Ctrl e". This centers in the 2-D viewports, on whatever is selected.
Now that we have the area of our room created in the top viewport. We need to give our room some depth. From either the "FrontView" or the "SideView" viewport grab the little white square on the bottom, in the middle of the other two squares. Drag it down to about 200. Doesn't have to be exact. These measurements are not written in stone.
 Now that you have your 200 by 300 dotted line cube drawn and centered, Hit enter on your keyboard. The white dotted line turned into a red solid line. This means that your brush is now solid. To see your brush we need to center it in the 3-D viewport. To do this we need to click on view from the drop-down menus. Go down the menu to "center 3-D views on selection", click on it. (Sorry, there is no shortcut for this one.)
Now you probably see some yellow lines in the 3-D viewport. This is because our camera view is inside the solid object, the block we just created. Oops, I mean the brush we just created. To view this brush, just use your mousewheel to scroll the camera back. Your mouse wheel allows you to zoom in and out, in the viewport that is active. A viewport becomes active just by moving your mouse over that viewport. So you can use the mousewheel to zoom in and out in all the viewports. Put your mouse back over the 3-D viewport to make it active. To move around in the 3-D viewport, you use your a,s,d,w buttons. That allows you to move forwards, backwards, and sideways. To pitch the camera up-and-down, use the arrow keys on your keyboard. So you'll be driving around your 3-D viewport with two hands. Try it. It takes some getting used to, but I have faith in you.
Don't worry if you can't find your way back. Just go to the "View" drop-down menu and click on "center 3-D views on selection". That should have put you back inside the bush, by Centering your view in the 3-D viewport.
From the icons on the left, click the "selection tool". That is the icon that looks like a red arrow. When you do this you will notice that the dimensions of the brush you just created shows up in ![]() all of the 2-D viewports, and that the red lines of the brush, are now dashed red and yellow. This means that this entity is selected. If your brush is not selected, then zoom out in the 3-D viewport and click on the brush. Center it again using the view drop-down menu.
all of the 2-D viewports, and that the red lines of the brush, are now dashed red and yellow. This means that this entity is selected. If your brush is not selected, then zoom out in the 3-D viewport and click on the brush. Center it again using the view drop-down menu.
We are going to turn this brush into our first room. With the brush centered in the 3-D viewport. And with the brush selected you will hit "Ctrl h" on your keyboard. This brings the the hollow tool dialogbox. All you need to do here is tell Hammer how thick you want Hammer to make the walls. A good rule for beginners, is 32 units for outside walls, and 16 units for inside walls. In this example we are going to make our walls 32 units thick. Type 32 in the dialogbox. Click OK. There you go. It's a room. Now that we have our hollow box, we need to texture the inside. Click on the texture tool. Click browse. Type "floor" in the filter. Select one of the floor textures by double clicking on it. (For this example, select concrete/concretefloor008a) Move the texture dialogbox out of the way of the 3-D viewport, if it is in the way. In the 3-D viewport right click on the floor to apply the floor texture. On the texture dialogbox, a.k.a. the "face edit sheet" dialogbox, click browse again, type brick in the filter. Select a brick texture by double clicking on it. (Select any brick texture) Apply the brick texture to all the walls and the ceiling by right clicking on the surfaces that you want to apply the texture to. (Use the W. A. S. D. keys and the arrow keys to navigate in the 3-D viewport.) At this point you only need to texture the inside, leave the nodraw texture on the outside.
Look at the texture dialog box. Notice the brick texture is now selected. Now left click on the  floor. I said left click! If you made a mistake and right clicked. Don't panic. Whenever you make mistake, just undo by hitting "Ctrl-z", or clicking the undo button near the top of this viewport. It is the button with the little blue arrow, looping back to the left. If you didn't click the wrong one then...
Notice the texture dialogbox, it now shows the floor texture that you just clicked on. This is another way you can select a texture without going to "browse" in the texture dialogbox. Left clicking with your mouse select's a texture, Right clicking with your mouse applies that texture. With this little procedure, you can save a lot of time by not having to go back to the texture dialogbox. Let us use it in an example now. Make the floor texture active in the texture dialogbox by left clicking on the floor. Then right click on the ceiling. Now the ceiling has the same texture as the floor. It is as simple as that.
Time to populate our room. We are going to work with the "Entity Tool" now. Click on the "entity tool". It is the icon on the left, just above the block tool. It looks like a little chessman. A pawn. When you click the entity tool, look to the column on the right. Look for the dialogbox titled "Move Selected". Right under that, are two text boxes. One title "Categories:" and one title "Objects:". In categories: it should say "Entities". In objects: it will say whatever entity is currently selected. Notice both text boxes have a drop-down arrow. As I said before don't change the categories. Leave it on entities.
In the "Objects:" text box, left click with the mouse. It should have highlighted whatever is in that textbox. Now hit "i" on your keyboard. Now it should say Info_camera_link. (By putting "i" in that box, it puts all the entities that start with "i" at the top of the list.) Click on the drop-down arrow. Use the scroll arrows on the right side of the drop-down menu and scroll down to
"info_player_allies". Click on info_player_allies. Now click your mouse in the 3-D viewport, in the middle of the room you just created. You just placed your first spawn point. That was an allied spawn point. Now place an axis spawn point. Click the drop-down arrow on the "objects" textbox. Select info_player_axis. Now click on the floor next to the allied guy. When placings spawn points take note of the yellow box hammer draws around the little green man. You want to make sure each of the yellow boxes do not touch. If they do, when the players spawn they will be stuck together. I know you have seen this before. And it sucks. (The yellow box is called the bounding box) you can see clearly if they are touching or not by looking at them in the top viewport. If they are touching. You need to move one of them. To move one. You need to click on the selection tool. It allows you to select entities and map geometry. Click on the selection tool. Now from either the top viewport, or the 3-D viewport click on one of the spawn points to select it. Now in all the viewport's you can see that this spawn point you just clicked on, is selected. Whenever you select something new, it is always a good idea to hit "Ctrl e" to center your selection in the 2-D viewports.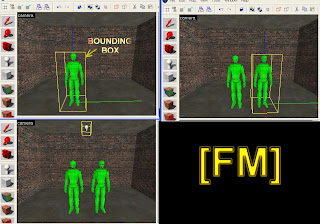
(Note: if you hold the "Ctrl e" and scroll with the mousewheel, you can zoom all three 2-D viewports at once. The mouse cursor just has to be over one of the 2-D viewports)
Now we are going to need some light. Click on the entity tool. In the column on the right, click in the text field under objects: type L. This brings all the entities that start with L. to the top of the list. It just so happens that "light" is at the top of the list. With categories: on entities, and objects: on light, go to the 3-D window and place a light in the center of the ceiling by clicking there. Click on the selection tool. (After placing your entities, it is a good idea to hit the selection tool to avoid accidentally placing unwanted entities into your map) press Ctrl e, to center the 2-D viewport's. You can also adjust the light by moving it in the top viewport.
The exact center the all objects are marked with a little "x". Move the light to the center of the room by lining up the two little x's in the topview viewport.

Later on, when your maps become complicated, you are going to want to be in the habit of saving your work often. Because it's going to happen to you. Hammer will crash. And if you don't save your work often. You could lose all of the work that you just done. At this point we should save our work. Click file, click save as, create a new folder, call it map1.(always create a new folder when you start a new map. So you will be able to find things in the future.) Save your file to this folder, call it whatever you like. But do not put any spaces in the name.
(Example: Do Not name your map "map one" -- Do it like this "map_one". No Spaces!)
Save your map. It saves your map as a .vmf file-that stands for valve media file or valve metaFile or something like that.
On the toolbar at the top of hammer, can you see the buttons with the red and blue letters on them, DD, DW and DR. Directly to the right of those, there's an icon that looks like a bicycle chain link. This is the run map icon. A shortcut for this one is F9. Click the run map icon or press F9. 
WELCOME to the run map dialogbox. Here you have a bunch of options. 
Set them as follows: RUN BSP - normal, RUN VIS - Fast, RUN RAD - Fast. Do not touch anything else. Click OK.
Your map is now being compiled, when it is finished hammer will start DOD and run your map.
(Note: to view maps that you have already made, you run DOD. And where it says "find servers", look for "create server". This will run the map on your computer. Go ahead and click on that. A dialogbox Will pop-up. Find your map name in the pulldown menu. And click start.)(if your map name does not show up there after you have compiled it, you probably have spaces in the name.)
You're finished, for now.
Until my next entry, you can experiment with what you know already. Disconnect from the map. Go back to the hammer editor. You do not have to close DOD if you do not want to. But go back to hammer, and do something like make a giant room. You can either practice creating a new giant room. Or you can stretch the box you already have. I think you should try both. That way you will know which is more efficient for you. Just remember, after you make the new box, the light and the spawn points will no longer be where you put them. You can either move them, then line them up using the 2-D viewports or you can just delete them. And reinsert them, using the entity tool. (Note: if you run your map and you find that you cannot join a team.Then your spawn points may be missing, or may be stuck in a wall or something.)
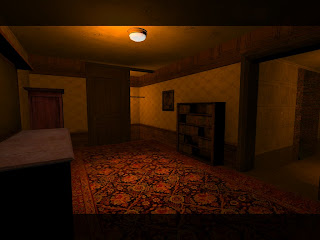
You can also try to make your room look like the room at the top of this page. By selecting different textures. To get a carpet texture, type carpet in the filter on the texture pallet. Just like you typed brick to get a brick texture. It works the same way. Type wall to get a bunch of different kinds of walls. Type wood to create a bunch of wood textures. Etc. etc. see you soon.
Cool Links


5 comments:
Post your comments Here
Disregard my last question, I got it working. :) I just created a server, versus running the map from Hammer.
Topher
Oh, my FIRST comment didn't show up either... hehe, nevermind then.
GREAT TUTORIAL! I'm using it now, it is so in-depth and easy to follow! Keep up the great work!
Regards,
Topher
I made the room but its just a square when i go inside of it. its all black not hollowed out =[
Is your room hollow in hammer?
If not, go back and follow the instructions to make it hollow. If it is hollow in hammer but not hollow when you goto the map. Then sounds like your map is not updateing. try creating a new vmf and delete the old one
Post a Comment